Your cart
There are no more items in your cart
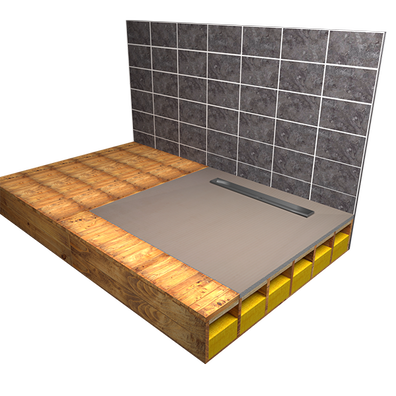
This installation guide shows how to install wet room kit shower tray Showerlay Wiper on a wooden floor and how to tile it over.
This installation guide has the steps needed to install your wet room kit shower tray. Showerlay Wiper installation on to a timber joist floor and how to tile over it. The materials used to produce your shower tray comprise of a foamed based XPS tray with a preformed 1%-2% slope and an integrated grade 304 stainless steel linear or square drain. The tray is waterproofed, reinforced with a microfiber mesh and coated with a cementitious glue.
Check our offer for wet room shower trays for timber floors.
Your Showerlay preformed tray will be 20, 28, 30, 35 or 40 mm thick. The thicker the tray, the greater and more noticeable the gradient slope will be. The top edge of the tray will need to be flush with the surrounding subfloor once installed, so you will need to cut out the floor boards to make space for the tray. Depending on the model of tray you have, means the integrated drain could be raised above the top base of the tray or flush with it. Be sure to lay your finish evenly across the tray and subfloor to ensure you have no uneven height increase.
We supply all of our Showerlay trays with a standard HC26 waste trap, but you can request a different waste trap from the selection we have on offer at no extra cost. Tanking kits can be purchased with your Showerlay tray. Each tanking kit covers a 3.5 m² area, which will waterproof your shower area. It is highly recommended that you waterproof your shower room to protect from any potential leakage through your finished tile work against water damage. Additional sealing materials found in our tanking kits can be purchased separately in the ‘Sealing Membranes’ and ‘Insulation Chemical’ category in our store.
Waterproofing your surrounding timber floor before covering it with tile is recommended. Sealing the timber can prevent condensation and protect both your subfloor and tiles. This means your tile stays dry and thus reduces the chance of mold, mildew and rot. A more in-depth guide to waterproofing is available on our DIY insulation guide page.


1. Prepare your floor and walls by removing any debris and dust. Clear your work space and prepare the required materials and tools for installation of your Showerlay tray. The tools you will require are as follows: spirit level, pencil, tape measure, jig saw, paint brush or roller, notched trowel, tile adhesive. Your Showerlay tray can be trimmed down to size if required. We recommend using a good quality handsaw if trimming is carried out. 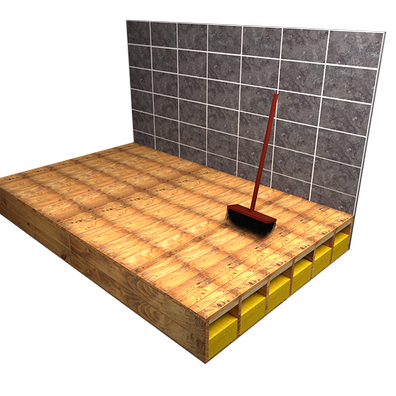
2. Establish the position you need your Showerlay tray to be installed by placing it on top of the existing floor boards. Make sure the tray is secure whilst you use a pencil to draw around the perimeter and also inside the drain outlet to mark the position of the waste trap. 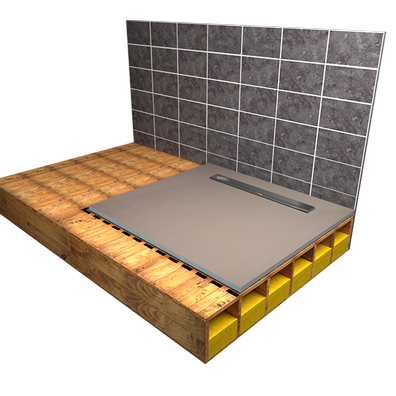
3. Using a jig saw, cut the floor boards using the pencil perimeter you traced. Remove the floor boards to expose the timber joists. To ensure maximum support, remove the floor boards to the center line of the closest joist. This way, your tray will have a fully supported base to be bedded on.
Take note:
Floor boards are usually roughly 20 mm thick, but if your boards are thicker, it is recommended to purchase one of our thicker trays. The integrated drain position on the underside of the tray. Depending on the thickness of your tray, could mean the underside of the drain sits proud a few millimeters below the tray. In this case you will need to take into account the depth the waste trap support will need to be fitted at.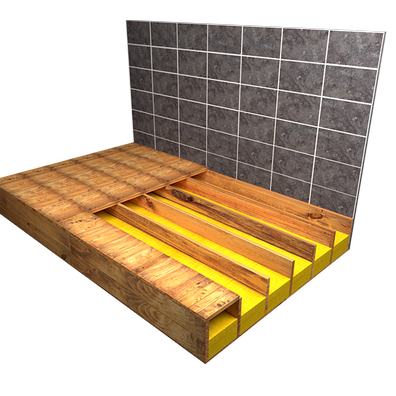
4. Find the best possible position and angle to connect the waste trap to your pipe work. The waste trap can be rotated 360° and the waste trap compres- sion fitted adapter can be used to adjust the height of the connected pipe work. Ensure the waste trap is supported beneath with a ply frame. 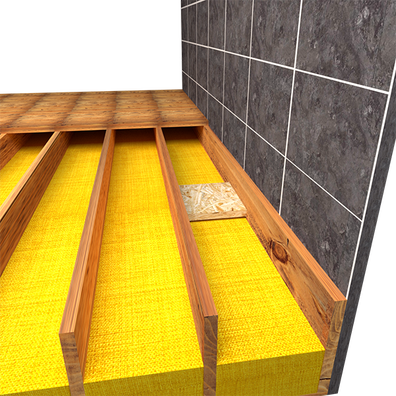
5. Connect your standard 40 mm pipe to the waste trap compression adapter. Ensure you fit the waste trap in a position which is aligned with the outlet of the Showerlay trays integrated drain once the tray is bedded. Once you are sure the waste trap is well supported and happy with the connected pipe position, perform a water test to be sure there is sufficient flow. 
6. To prepare the base for your tray, you will need to fit 20 mm thick marine plywood between the joists. This can be done, by creating 30 x 50 mm batons along the inner side of the joist running parallel 20 mm below the top edge of the joist. This will ensure the ply sits flush with the top edge of the timber joist. Make sure to check if the drain integrated into your tray sits proud. In this case you will need to chisel or trim the ply to allow space for the channel. 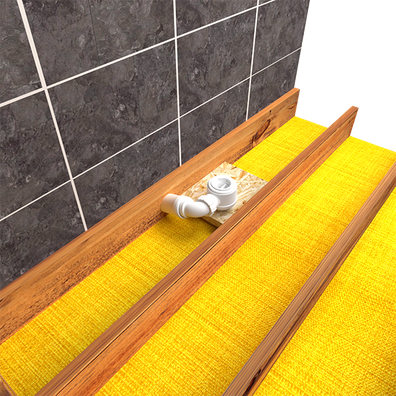
7. Test the positioning of your Showerlay tray. Ensuring it will be flush with the surrounding subfloor once bedded and that you can connect the waste trap to the drain outlet. Use a spirit level to make sure the tray is level and the gradient slope to the drain is the lowest point on the tray. 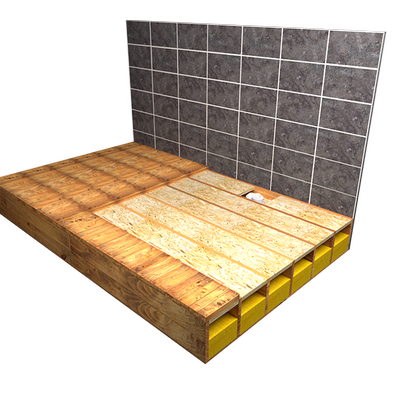
8. Using good quality tile adhesive and a notched trowel, evenly apply 0.5 – 1 mm over the entire timber base area where your tray will lay. Bed your tray over the ply and timber joist base and attach the waste trap to the drain outlet, using the provided screw fixture and then silicone to seal. Your Showerlay tray should now be flush with the surrounding floor boarded subfloor. Once complete, use a spirit level to check the tray is laid correctly and flush in position. 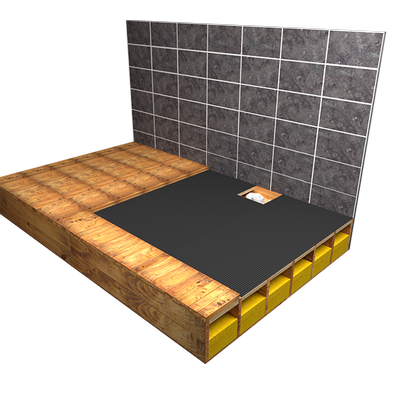
9. Depending on the model of tray you have, means the integrated drain could be raised 15 – 20 mm above the base of the tray or flush with it. If the integrated drain is raised, you will need to ensure the top edge of your tile is flush with the top lip of the drain channel. If you need to build up space beneath your tile to make it flush with the drain, you can use tile backer boards. Backer boards are not only good for building up space, but also used for waterproofing floors and walls. Once laid, using membrane sealing tape and PCI lastogum found in our waterproofing kit, seal the edges of the boards, edges between the wall and floor corners and also the tray to fully waterproof your wet room.